Street food is widely popular around the world due to its delicious flavors and accessibility.
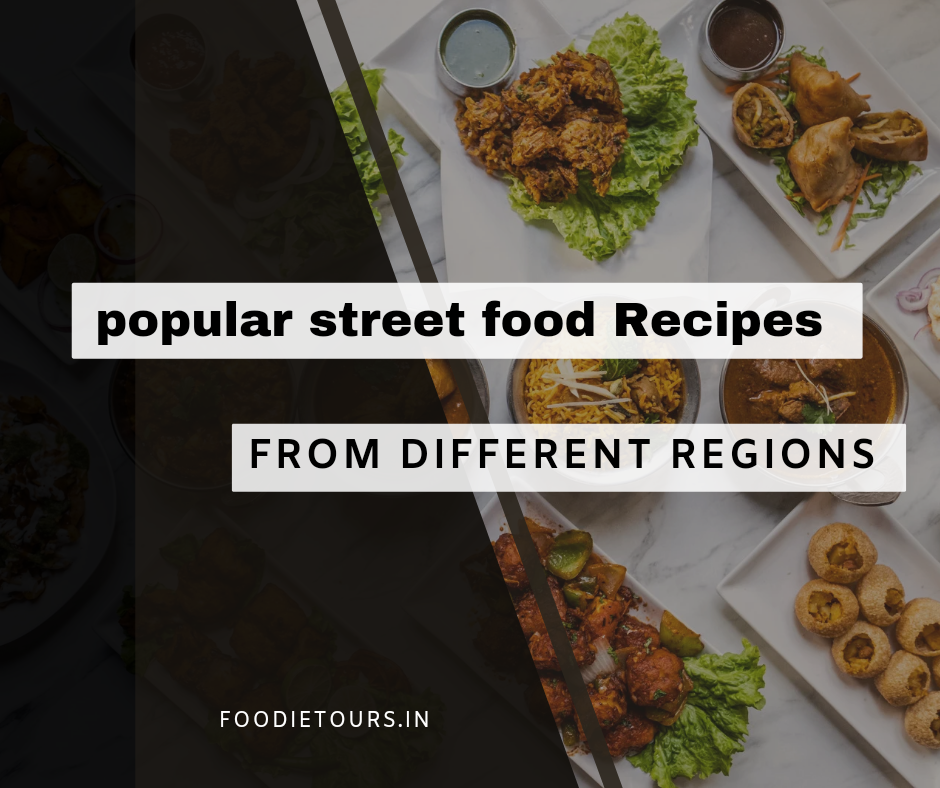
Here is the best tasty street food list available.
1. Pani Puri/ Gol Gappa :
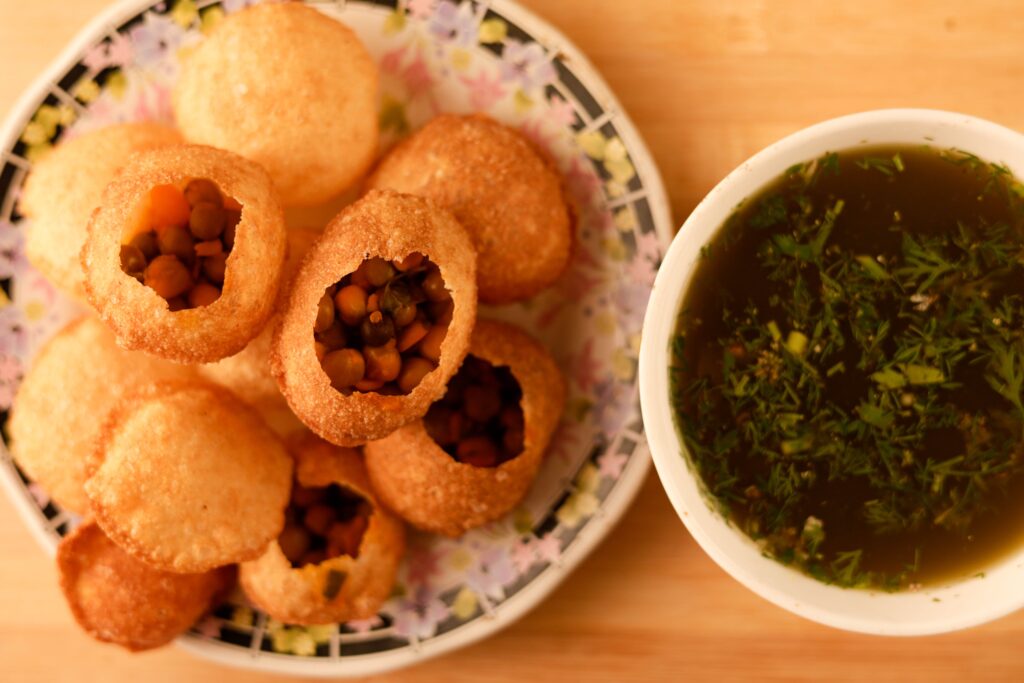
This Indian street food consists of hollow puris filled with spicy and tangy water, mashed potatoes, tamarind chutney, and chickpeas. It’s a burst of flavors and textures in every bite. they are then dunked into flavored spice.
Here’s a delicious recipe for pain puri, a popular Indian street food snack.
INGREDIENTS :
Firstly for the puris-
- 1 cup semolina ( Rava)
- 1/4 cup of all-purpose flour ( Maida)
- Water for kneading the dough
- A pinch of salt to test
- Oil for deep frying
For the filling-
- 1 cup mashed potatoes (Boiled)
- 1/2 cup finely chopped onions
- 1/2 cup chopped coriander leaves
- 1/2 cup chickpeas (Boiled)
- Tamarind chutney (Store-bought or homemade)
- Mint-coriander chutney (Store-bought or homemade)
For the pain (Spiced water)-
- 4 cup chilled water
- 1 cup fresh coriander leaves
- 1 cup fresh mint leaves
- 1-inch piece of ginger
- 1 green chili (Adjust to taste)
- 2 tablespoons tamarind plump
- 1 teaspoon roasted cumin powder
- 1 teaspoon chaat masala
- 1/2 teaspoon black salt
- Salt to taste
Now let’s make (Instructions) :
- To make the puris, mix the semolina(rava), all-purpose flour (maida), and salt to taste in a bowl. Gradually add water and knead it into a stiff dough. Cover the dough with a damp cloth and let it rest for 20-30 minutes.
- After resting, divide the dough into small balls and roll them out into small circles, around 2-3 inches in diameter.
- Heat oil in a deep pan for frying. Fry the puris in batches until turn crisp and golden brown. Remove them from the oil and place them on a paper towel to remove excess oil. Set aside to cool.
- For the filling, mix the boiled and mashed potatoes, boiled chickpeas(chana), chopped onions, and coriander leaves in a bowl. Set aside.
- To make the pain, blend mint leaves, coriander leaves, green chili, and ginger together to form a smooth paste. Transfer the paste to a large bowl.
- Add tamarind pulp, roasted cumin powder, chaat masala, black salt, and salt to the mint-coriander paste. Mix well.
- Gradually add child water to the mixture, stirring continuously, until well combined to your taste preferences.
- To serve, take a puri and gently crack it open from the top, making a small hole. Stuff with a teaspoon of filling mixture.
- Dip the stuffed puri into the prepared pani and place it on a serving plate.
- Repeat the process with the remaining puris and serve immediately.
2. Tacos :
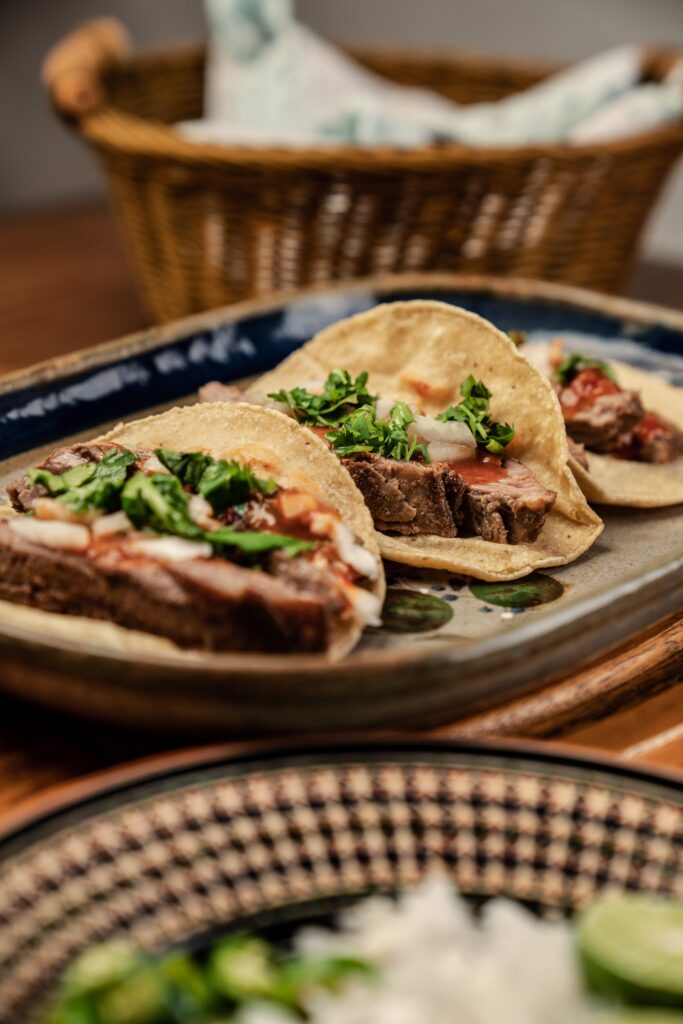
Tacos have become increasingly popular as street food in the United States. and they are typically made with soft or crispy tortillas filled with various fillings such as seasoned meat (beef, chicken, or pork), fish, shrimp, and vegetarian options. toppings often include salsa, guacamole, cheese, sour cream, and lettuce.
Tacos come in many styles, including soft and hard shells, and they are often customizable to suit your taste, you can find them at food trucks, stands, and restaurants across the United States, making them a go-to option for a quick and tasty meal on the go.
Here are some ingredients :
- 1 lb ground beef (or your choice of protein like chicken, pork, or tofu)
- 1 packet of taco seasoning mix ( or make your own with chili powder, cumin, paprika, etc.)
- 8 small soft tortillas (corn or flour, your preference)
- 1 cup shredded lettuce
- 1 cup diced tomatoes
- 1/2 cup diced onions
- 1/2 cup shredded cheese ( usually cheddar or Monterey Jack)
- Salsa, sour cream, and guacamole (optional)
INSTRUCTIONS :
- In a skillet over medium heat, cook the ground beef until it’s browned and crumbled. Drain any excess fat.
- Add the taco seasoning mix (follow the instructions on the packet) and a little water. If you’re making your own seasoning, add about 2-3 tablespoons and adjust to taste.
- Heat the tortillas in a dry skillet or microwave for a few seconds until warm.
- Assemble your tacos by placing the seasoned meat in the center of each tortilla.
- Top with lettuce, tomatoes, onions, and cheese.
- Add salsa, sour cream, and guacamole if desired.
- Fold the tortillas in half and enjoy your American-style street food tacos!
Feel free to customize your tacos with other toppings like jalapenos, cilantro, or hot sauce to suit your taste. Enjoy your delicious homemade street food tacos!
3. Hot Dogs :
The American street food classic, the hot dog, is an iconic and beloved dish found throughout the United States. This simple yet satisfying creation consists of a cooked sausage, traditionally made from beef or pork, nestled inside a soft bun. What sets American hot dogs apart is the sheer variety of toppings and condiments available. from classic mustard and ketchup to diced onions, sauerkraut, relish, and more, the options for personalizing your hot dog are endless.
Hot dog stands and food trucks are common sights on city streets and at sporting events, making it a convenient and delicious option for a quick, on-the-go meal. Whether you prefer a classic “dog” or a creative concoction with unique toppings, the American hot dog is a staple of street food culture and a symbol of culinary innovation.
The origin of the term “hot dog” is a bit of a mystery, but it is believed to have evolved from various sources. One common theory is that it was coined in the late 19th century in the United States. Here are a couple of theories on how the name might have come about. Here is a basic easy recipe for American-style street hot dogs
INGREDIENTS :
- 4 hot dog buns
- 4 beef or pork hot dogs
- 1/2 cup of chopped onions
- 1/2 cup of diced tomatoes
- 1/4 cup of pickle relish
- Mustard and ketchup
- Optional toppings: shredded cheese, sauerkraut, jalapenos slices
INSTRUCTIONS :
- Preheat your grill or stovetop pan over medium heat.
- Grill the hot dogs: Place them on the grill or pan and cook, turning occasionally, until they are heated through and have nice grill marks (usually 5-7 minutes).
- Toast the buns: While the hot dogs are cooking, you can also lightly toast the hot dog buns on the grill or in a toaster.
- Assemble the hot dogs: Place the grilled hot dogs into the buns.
- Add toppings: Top the hot dogs with chopped onions, diced tomatoes, pickle relish, and any other desired toppings.
- Finish with condiments: Add mustard and ketchup to taste.
- Serve hot: Enjoy your delicious American street-style hot dogs while they are still hot!
Feel free to customize your hot dogs with other toppings like shredded cheese, sauerkraut, and jalapenos slices to suit your taste.
4. Pad Thai (Phad Thai) :
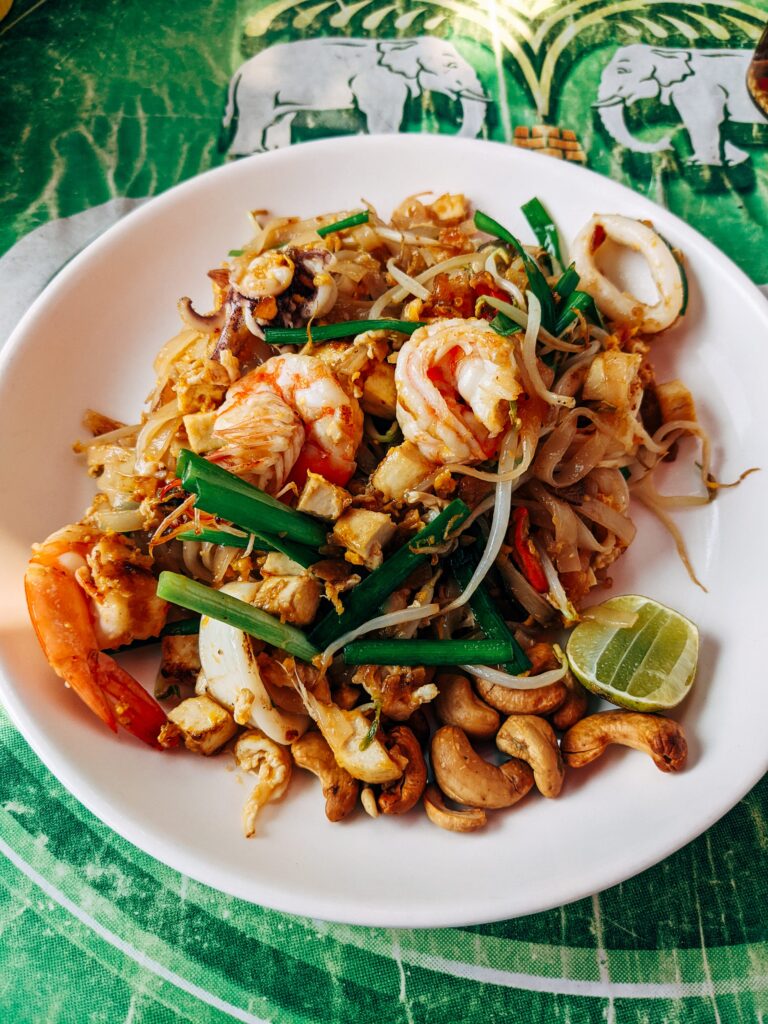
Originating in Thailand, Pad Thai is believed to have been created during World War II as part of a nationalistic effort to promote PSD Thai identity and unify the country. The specific creator of Pad Thai is not definitively known, but it became more widely known and enjoyed across Thailand after the war.
Pad Thai is a popular and flavorful stir-fried noodle dish from Thailand. It typically consists of rice noodles stir-fried with eggs, tofu, and protein (such as chicken, shrimp, or beef), bean sprouts, garlic, and shallots, and flavored with a combination of tamarind sauce, fish sauce, sugar, and dried chili. This dish is loved for its combination of sweet, sour, salty, and something spicy flavors. It’s often garnished with chopped peanuts, lime wedges, and additional seasoning based on personal taste preferences. Now let’s make delicious pad Thai!
Here are the ingredients :
- 8 oz ( about 225g) flat rice noodles
- 2 tablespoons oil (peanut, vegetable, or canola)
- 2 cloves garlic, minced
- 8 oz (225g) protein ( chicken, shrimp, tofu, or a combination)
- 4 green sliced onions
- 2 cups bean sprouts
- 2 eggs
- 1/4 cup chopped peanuts
- Lime wedges ( for serving)
For the sauce:
- 3 tablespoons of fish sauce
- 3 tablespoons of tamarind paste
- 2 tablespoons rice vinegar
- 2 tablespoons sugar
- 1 tablespoon chili sauce or chili flakes (adjust to taste)
Instructions for making :
- Prepare the noodles: Soak the rice noodles in hot water for about 8-10 minutes until they’re softened but still firm. Drain and set aside.
- Make the sauce: In a bowl, mix together fish sauce, tamarind paste, rice vinegar, sugar, and chili sauce. Adjust the ingredients to achieve your desired sweet, sour, and salty balance. Set the sauce aside.
- Cook the protein: Heat 1 tablespoon of oil in a large pan or wok over medium-high heat. Add minced garlic and stir for about 30 seconds. Add the protein and cook until it’s done. push the protein to the side of the pan.
- Cook the eggs: Crack them into the pan and scramble them until cooked. Mix the eggs with the protein.
- Add noodles and sauce: Add the soaked and drained rice noodles to the pan/wok. pour the prepared sauce over the noodles. toss everything together until the noodles are well coated with the sauce.
- Add vegetables: Add bean sprouts and sliced green onions to the pan. toss everything together and cook for an additional 1-2 minutes until the bean sprouts are slightly cooked but still crunchy.
- Serve: Garnish with chopped peanuts and serve hot with lime wedges on the side for squeezing over the Pad Thai.
5. Shawarma :
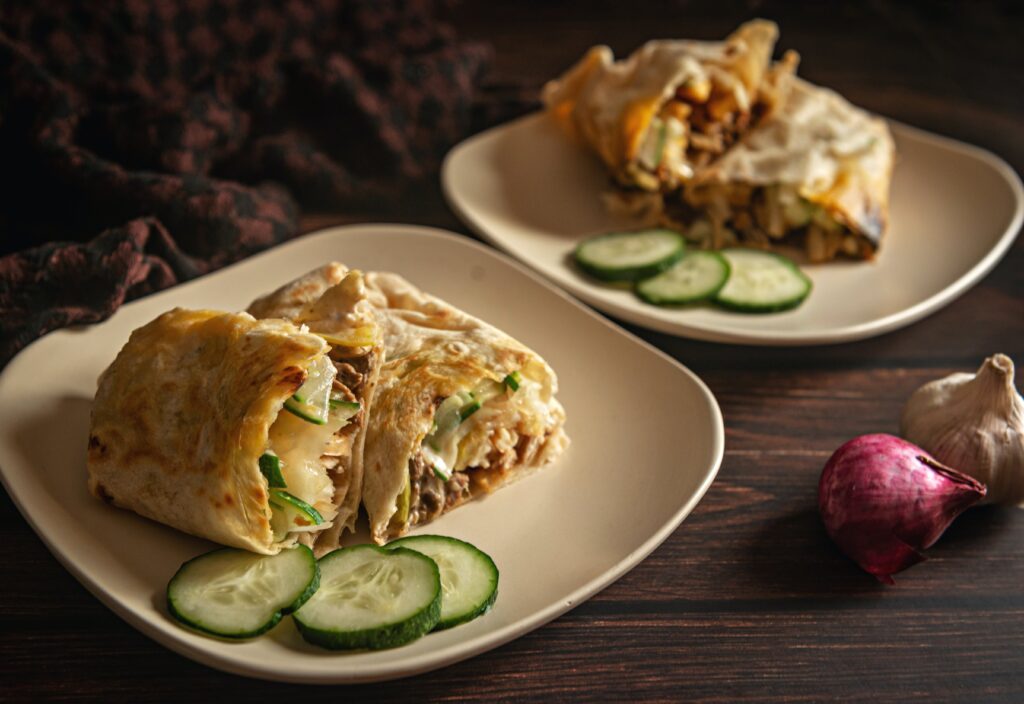
Shawarma is a Middle Eastern dish that originated in the Levant region, specifically in countries like Lebanon, Turkey, and Syria. its history dates back to the 18th or 19th century, with its exact origins debated among these countries. Traditionally, shawarma consists of marinated meat (often lamb, chicken, beef, or a mix) stacked in a cone-like shape on a vertical rotisserie. The meat is slowly roasted and then thinly sliced. It’s typically served in pita bread or flatbread, accompanied by vegetables, tahini sauce, hummus, or other condiments.
Over time, shawarma spread to various parts of the world and became popular in different cuisines due to its delicious taste and adaptability to local presences. its global popularity has led to variations in recipes and serving styles in different regions.2 t
Ingredients:
- 500g boneless chicken thighs, thinly sliced
- 2 tablespoons plain yogurt
- 2 tablespoons ground cumin
- 2 tablespoons paprika
- 3 cloves garlic, minced
- 1 teaspoon ground turmeric
- 1 teaspoon ground coriander
- 1/2 teaspoon ground cinnamon
- 1/4 teaspoon cayenne pepper (adjust to taste)
- Salt and pepper to taste
- 2 tablespoons olive oil
- Pita bread or flatbread
- Chopped lettuce, tomatoes, and onions (for serving)
- Tahini sauce and garlic sauce (optional, for serving)
LET’S MAKE ( Instructions) :
- Marinate the chicken: In a bowl, combine the yogurt, minced garlic, ground cumin, paprika, turmeric, coriander, cinnamon, cayenne pepper, salt, and pepper. Mix well. Add the thinly sliced chicken to the marinade, making sure it’s coated evenly. cover the bowl and refrigerate for at least 1 hour, or ideally overnight for better flavor.
- cook the chicken: Heat olive oil in a skillet over medium-high heat. Add the marinated chicken and cook for about 5-7 minutes, or until the chicken is fully cooked and slightly charred. Set aside.
- Prepare the Shawarma: Warm the pita bread or flatbreads in a pan or oven. Place a generous amount of cooked chicken in the center of each bread. Then add chopped lettuce, tomatoes, onions, and any sauce ( tahini or garlic sauce} you prefer.
- Wrap and Serve: Fold the sides of the brad over the filling, creating a wrap or pocket. Serve the chicken shawarma immediately while it’s warm.
Feel free to adjust the seasonings or add other ingredients like pickles, cucumbers, and hot sauce according to your taste preferences. Enjoy your homemade chicken Shawarma!
6. Arepas :
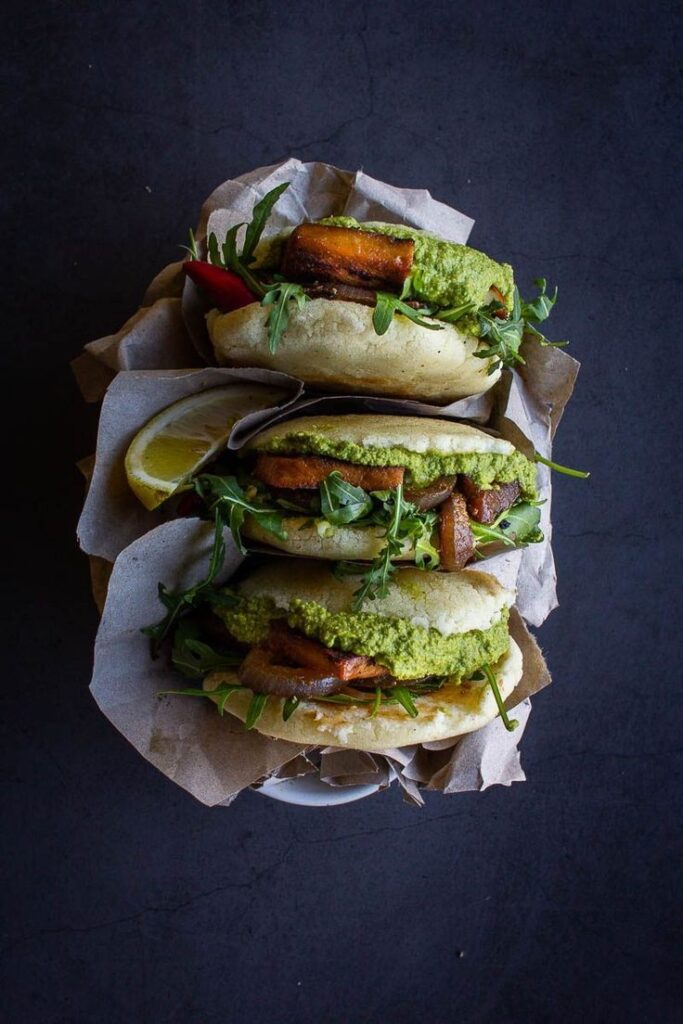
Arepa is a popular dish in Colombian and Venezuelan cuisine. It is a type of round, flatbread made from cornmeal or maize flour, usually grilled, baked, or fried. Arepas have been a staple food in the region for centuries, with indigenous peoples in Colombia and Venezuela having made variations of this food long before the arrival of Europeans. The exact origin of arepas is believed to be traced back to the indigenous tribes of the Andes and Caribbean regions in Colombia and Venezuela. They were initially prepared using corn dough by grinding dried corn kernels. Arepas have evolved and are now a versatile food item, often served stuffed with various fillings such as cheese, meat, beans, or avocado.
Today, arepas are enjoyed in many different ways and have gained popularity beyond Co; Colombia and Venezuela, becoming a beloved dish in many parts of the world due to their delicious taste and versatility in fillings.
Ingrideints for arepa :
- 2 cups pre-cooked cornmeal (also known as masarepa and mas harina)
- 1 1/2 to 2 cups lukewarm water
- 1 teaspoon salt
- your choice of filling (e.g., cheese, meat, beans, avocado)
Now making time ( Instructions) :
- Prepare the dough: In a mixing bowl, combine the pre-coked cornmeal (masarpea) and salt. Gradually add lukewarm water while stirring continuously until you get a soft and slightly sticky dough. Let it rest for 5-10 minutes.
- Shape the arepas: Divide the dough into equal-sized portions and shape them into balls (roughly 2-3 inches in diameter). Flatten each ball with your palms to create a round disc, about 1/2 to 3/4 inch thick.
- Cooking Arepas: Heat a non-stick skillet or griddle over medium heat and lightly grease it with oil or cooking spray. Place the shaped arepas on the heated skillet and cook them for about 5-6 minutes on each side or until they develop a golden crust. you can cover the skillet while cooking to ensure the arepas cook through.
- Finishing Touch: Once both sides are golden and the arepas are cooked through (they should sound hollow when tapped). transfer them to a plate lined with a paper towel to absorb any excess oil.
- Serve and Fill: Allow the arepas to cool for a few minutes before slicing them open, creating a pocket for the filling. and then fill the arepas with your preferred ingredients such as cheese, shredded meat, beans, avocado, and any other fillings of your choice.
Enjoy your tasty and easy arepas as a delicious snack or a complete meal with your favorite fillings!
7. Samosa :
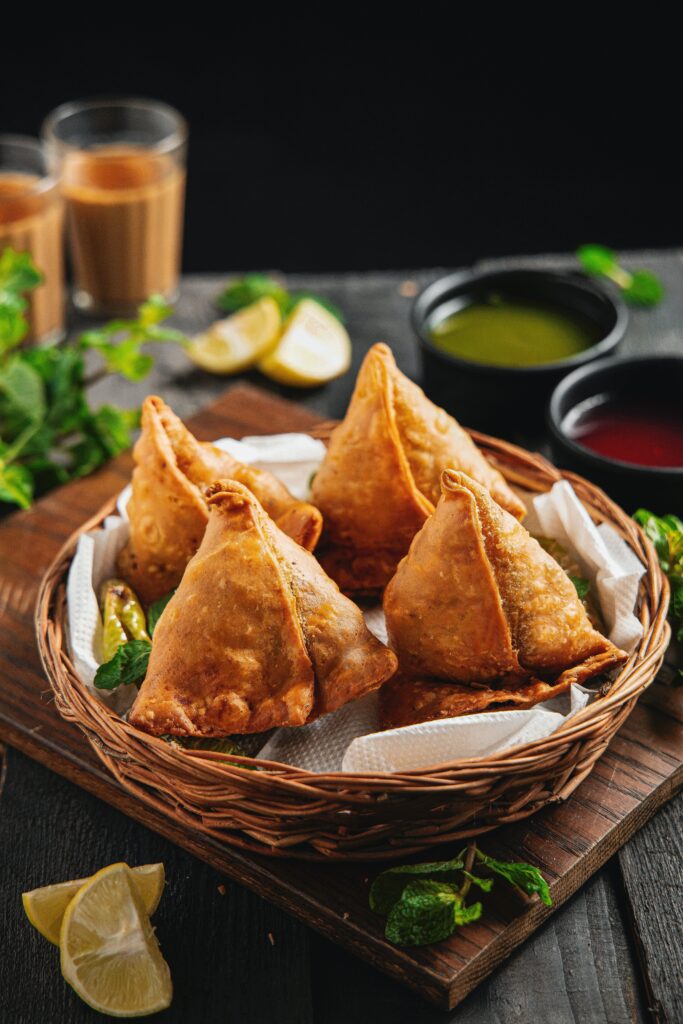
Samosa is a popular savory snack in many South Asian and Middle Western cuisines. it consists of a triangular or cone-shaped pastry filled with a variety of ingredients such as spiced potatoes,lentils, oniens,peas,minced meat (often beef, lamb, or chicken), and various spices.
The history of samosas traces back centuries to the middle East and Central Asia, likely originating in what is now presents- day Iran or merchants introduced samosas to the Indian subcontinent and evolved into the versions known today. Over the samosas became an integral part of Indian, Pakistani, Bangladeshi, and Middle as a popular street food and appetizer in these regions, and the fillings and shapes can varybased on regional preferences and cultural influences.
Samosas are usually fried until golden and crispy, making them a delicious and versatile snack enjoyed by many cultures around the world. Ok so let’s make yummy samosas.
Ingredients:
For the pastry dough:
- 2 cup all-purpose flour
- 4 tablespoons vegetable oil or (you can use melted ghee also)
- 1/2 teaspoon salt to taste
- 2/3 cup warm water
For the filing:
- 3-4 medium-sized potatoes, boiled, peeled, and mashed
- 1 cup green peas (fresh or frozen)
- 1 small finely chopped onion.
- 2-3 finely chopped green chillies (adjust to taste)
- 1 teaspoon grated ginger
- 1 teaspoon grated garlic
- 1 teaspoon cumin seeds
- 1 teaspoon garam masala
- 1 teaspoon ground coriander
- 1/2 teaspoon turmeric powder
- 1-2 tablespoons vegetable oil
- salt to taste
- oil for frying
How to cook (Instructions):
1. Prepare the Dough:
- In a mixing bowl, combine the all-purpose flour, salt, and oil or melted ghee.
- Gradually add warm water and knead the mixture into a firm, smooth dough. Cover the dough with a damp cloth and set out aside for at least 30 minutes.
2. Make the Filling:
- Heat oil in a pan over medium heat. Add cumin seeds and let them splutter.
- Add the chopped onions, green chillis, grated ginger, and garlic. Saute until the onions turn translucent.
- Add turmeric powder, ground coriander, and garam masala. Mix well.
- Add the mashed potatoes and green peas. Stir-fry the mixture for a few minutes until well combined. season with salt. Remove from heat and let the filling cool.
3. Shape and Fill the Samosas:
- Divide the dough into equal-sized balls (about golf ball size). Roll each ball into a thin oval or circle.
- Cut each rolled-out dough into halves, creating semi-circles.
- Take one semi-circle. moisten the straight edge with a little water, and a cone shape by folding and pressing the straight edge together.
- Fill the cone with a spoonful of the prepared filling, ensuring not to overfill.
- Moisten the open edges of the cone and press to seal the samosas. Repeat with the rest =of the dough and filling.
4. Fry the Samosas:
- Heat oil in a deep frying pan or skillet over medium heat.
- Once the oil is hot, gently slide the prepared samosas into the oil, a few at a time, without overcrowding the pan.
- Fry the samosas until they turn golden brown and crispy on all sides. Ensure the heat is on medium to ensure the samosas cook evenly without getting too dark.
- Remove the fried samosas using a slotted spoon and place them on a paper towel-lined plate to drain excess oil.
Your homemade samosas are ready to be served! Enjoy them hot with your favorite chutneys or sauces.
8. Falafel :

Falafel is a widely loved and popular dish in Middle Eastern cuisine, particularly in countries like Lebanon, Israel, Egypt, and others in the Levent region. These crispy, deep-fried balls or patties are typically made from ground chickpeas or fava beans, mixed with herbs spices, and sometimes onions. The exact origins of falafel are a bit debated, with different claims suggesting various points of origin. However, it’s widely believed that falafel’s roots can be traced back to Egypt, where it might have originated as a replacement for meat during Lent when meat was avoided. some sources also suggest that falafel might have originated in India, using chickpeas, and then spread to the Middle East.
Falafel’s popularity continues to grow globally due to its vegetarian and vegan-friendly nature, along with its delicious taste and versatility in various cuisines.
Here is a simple recipe for making Falafel
Ingredients :
- 1 1/2 cups dried chickpeas (soaked overnight in water)
- 1 small roughly chopped onion
- 3-4 minced cloves garlic
- 1 cup fresh chopped parsley
- 1 cup fresh chopped cilantro
- 1 teaspoon ground cumin
- 1 teaspoon ground coriander
- 1/2 teaspoon baking soda
- Salt to taste
- Black pepper to taste
- Oil for frying
Instructions for making Falafel :
1. Prepare the Chickpeas:
- Drain the soaked chickpeas and rinse them thoroughly.
- Pat them dry using a kitchen towel or paper towels.
2. Blend the ingredients:
- In a food processor, combine the drained chickpeas, chopped onion, minced garlic, parsley, cilantro, ground cumin, ground coriander, baking soda, salt, and black pepper.
- Pulse the mixture until it forms a coarse paste. Avoid over-blending; you want a texture that’s a bit grainy but holds together.
3. Shape the Falafel:
- Transfer the Falafel mixture to a bowl. If the mixture seems too wet, you can add a little bit of flour or chickpea flour to help bind it.
- Form the mixture into small balls or patties, roughly 1 1/2 inches in diameter. You can use your hands or a falafel scoop to shape them evenly.
4. Fry the Falafel:
- Heat oil in a deep skillet or frying pan over medium-high heat.
- Gently place the formed falafel balls or patties into the hot oil, ensuring not overcrowd the pan.
- Fry the falafel for about 3-4 minutes per side or until they turn golden brown and crispy.
- Once cooked, remove the falafel using a slotted spoon and place it on a plate lined with paper towels to absorb excess oil.
5. Serve:
- Serve the falafel warm with pita bread, human, tahini sauce, chopped vegetables, or in sandwiches. They are traditionally served with salad and sauces like tahini or tzatziki.
Enjoy your Falafel as a delicious and flavorful snack or part of a satisfying meal!
Leave a Reply